Exploring Ember Polaris: A Fresh Take on the Component Format
What if you could put multiple "single-file components" into one file? Without JSX Spaghetti? Ember's <template> syntax has already landed, and it's kind of the best of both worlds.

For the most part, the component format in web frameworks falls into one of two camps.
- Single File Components, which provide an HTML-based template syntax, a declarative way to handle conditionals and loops, and other syntax extensions (like directives) that feel right at home in HTML. Vue and Svelte are two major frameworks that use Single File Components.
- JSX, which provides a way to build up fragments of HTML using an XML-like syntax embedded in JavaScript.
While only React-like frameworks use this approach, React-like frameworks are extremely popular. This can give the impression that there's a strong ecosystem consensus around JSX. In reality, unless a new framework is explicitly trying to visually resemble React, it almost always chooses a templating language.
When explaining the choice to use templates, frameworks usually give a sales pitch that has something to do with performance. But that's not the primary reason that frameworks are attracted to templating languages.
Template Languages Are Good, Actually
So why do new frameworks tend to choose templating engines when the conventional wisdom is that JSX proved that templates are old and busted?
1. As a user of these frameworks, you can start with static HTML and layer dynamism on top, rather than learning and remembering a whole new syntax and semantics for static content.
<img class="hero" src="/assets/hero.png">

<form>
  <input value="hello world" style="--theme: red">
</form>
This just works. No lectures about eating your syntax vegetables required.
Templating languages are typically built on HTML, which means that you can start with valid HTML and layer dynamic bits on top. In fact, you can tell that you're looking at a template engine if you can grab some valid, static HTML, paste it into your file, and expect it to work.
🕵 A Closer Look: Attributes, Web Components and SVG
Because templating engines use HTML as their foundation, it is very easy to write an HTML attribute in a templating language (an attribute in a templating language is spelled... like an attribute).
Web components and SVG tags just work, and not because of a pile of brittle heuristics that a project whack-a-mole'd into existence to address bug reports that kept cropping up.
htmlFor and className in React are glaring reminders of the fact that you're writing embedded XML rather than HTML, but they're just the tip of the iceberg. JSX adherents do a great job of convincing the world that "it doesn't make that much of a difference," but it really does.
2. You can understand the whole component's structure by reading its template from top to bottom.
{#if itJustWorks}
  <p>It Just Works!</p>
{/if}

<ul>
  {#each thingsThatWork as thing}
    <li>{thing} also just works!</li>
  {/each}
</ul>
Conditionals and loops are interleaved with your markup (using Svelte syntax as an example)
Conditionals and loops are fundamental concepts in programming, and templating engines always have built-in syntax for conditionals and loops. This makes it possible to look at a component's template and understand what it's doing in one shot.
3. You write your component's setup logic in one place and it runs exactly one time. Your rendering logic takes the state that you set up and turns it into HTML that remains up to date as reactive data changes.
<script setup>
  const count = ref(0)
  const increment = () => count.value++;
</script>

<template>
  <p>The count is {{count}}.</p>
  <button @click="count++">Increment</button>
</template>
The setup is in one place. The rendering logic is in another. (using Vue syntax as an example)
In contrast, your setup logic in a hooks-based framework is a subtle consequence of the way each of the hooks that you use in your component behaves during setup, rendering and in other parts of the lifecycle.
function Counter() {
  // This _function_ runs over and over again, but the
  // initialization of `count` to `0` happens only once
  const [count, setCount] = useState(0);

  const increment = () => setCount(count + 1);

  return (<>
    <p>The count is {count}.</p>
    <button onClick={increment}>Increment</button>
  </>)
}
Pop Quiz: Did you need useCallback here? Is the useEvent RFC relevant?
increment? If you did, you're probably screaming 😡 at me at the top of your lungs. But maybe it would just be better if the setup logic was separate? 🤔The charitable point of view is that hooks are high-level, declarative building blocks, and you're not supposed to think about how they behave during each part of the lifecycle.
But people do want to think about the "mount" phase of their components. They end up twisting themselves into pretzels to try to understand and control the setup phase.
At the end of the day, this mismatch makes hooks feel significantly more complex and leads to far more confusion and debate than the designers of hooks intended.
Some Issues With Single-File Components
While those benefits may seem like a slam dunk argument for SFCs, JSX proponents have some strong arguments against them.
The SFC format is, indeed, quite ergonomic. But it has some major downsides.
1. Extracting a small helper component adds a lot of friction.
Even if you think that components should ultimately end up in their own files, it's really nice to be able to sketch out a few related components in a single file while developing them.
2. The syntax for invoking components in tests is very different from the syntax for invoking them in an application.
This isn't so bad if you're just invoking your component with props.
But if you want to test advanced features, like directives or slots (especially if you want to test real-world uses, like scoped slots or passing dynamic content to slots), it gets a lot uglier.
test('layout full page layout', () => {
  const wrapper = mount(Layout, {
    slots: {
      header: Header,
      main: h('div', 'Main Content'),
      sidebar: { template: '<div>Sidebar</div>' },
      footer: '<div>Footer</div>'
    }
  })

  // ...
})
An example from the Vue Test Utils docs. This isn't the end of the world, but it's pretty different from how you'd write this if you were invoking Layout in an app.
Beyond the ugliness, the fact that you can't just use the syntax you already know to invoke your components in test files means that you need to learn a second syntax (with its own set of quirks) to test components robustly.
Ultimately, this means that the investment a framework makes into the ergonomics of Single File Components works really well in single file component files. But when you're not inside of a Single File Component file, all of that ergonomic investment disappears in a puff of smoke.
All things being equal, I would still personally prefer Single File Components to JSX any day of the week.
But what if we could combine the benefits of Single File Components with the ability to naturally have multiple components in a single file?
That's the point of the .gjs format in the Polaris Edition of Ember.
Components in Polaris
Starting Small: Let's Add Some Imports
The design of the new Polaris component format in Polaris started out as a way to get imports into templates.
📖 A Little Bit of History
In the Octane Edition of Ember, templates were in their own .hbs files. When you invoke the <Hello /> component, Ember auto-imports the component from app/components/hello.hbs.
We wanted a way to import Hello explicitly, and that ultimately evolved into the Polaris component format.
This is why the library that implements this feature is called ember-template-imports and why people sometimes call the feature "Template Imports".
The most basic way to use the new format looks exactly like that: a traditional Ember template plus some imports.
import Accordion from "./accordion";

<template>
  <Accordion>
    <:header>I can expand and contract!</:header>
    <:body>
      Here's a lot of information that you can
      expand or contract.
    </:body>
  </Accordion>
</template>
app/components/info.gjs
What's nice about this simple way of using <template> is that it looks very similar to a traditional Single File Component. But this is just the beginning of the story.
Local Helper Components
The second way to use the <template> syntax is as a JavaScript expression.
<template>
<Hello>Tom</Hello>
</template>
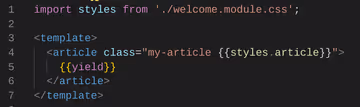
const Hello = <template>
<p>Hello, {{yield}}</p>
</template>The first <template> is the default export of the module. It uses the Hello component, which is defined by the second <template>.
In Polaris-style components, the <Hello> invocation in a template refers to an in-scope variable. You can define a simple helper component by assigning a <template> to a variable.
🕵 Local Variables: A Closer Look
You can even use lowercase names for your components: as long as the name after the < refers to an in-scope variable, it's treated like a component. That said, we recommend that you avoid using variable names that could be confused with HTML, and ember-template-lint's recommended config includes a rule that disallows it.
But there's more. You can also use <template> expressions in tests! Because of course you can.
import Avatar from 'app/components/avatar';

test('renders name argument', async function (assert) {
  const initial = 'Zoey';
  await render(
    <template>
      <Avatar @title="Picture of Zoey" @initial={{initial}} />
    </template>
  );
  assert.dom().hasText(initial);
});
An example from the official Ember docs.
This also allows you to define constants in your test file and use them directly in your tests.
Most importantly, this use of <template> is literally identical to the way it's used in files implementing components. There's no special syntax for attributes, arguments or modifiers.
Adding State
You can also use <template> to define the template for a stateful component.
import Component from "@glimmer/components";

export default class extends Component {
  @tracked count = 0;

  increment = () => this.count++;

  <template>
    <p>{{this.count}}</p>
    <button {{on "click" this.increment}}>++</button>
  </template>
}
When you use <template> in this way, the template becomes the "render function" of the component, and this refers to an instance of the component class.
🕵 Why Does Ember Use Classes Here?
Templating engines always provide a way to separate a component's setup logic ("instantiation") and per-instance state from the component's "render function," which converts component state into HTML.
Since JavaScript classes are a built-in way to describe objects that can be instantiated, Ember uses classes to represent these sorts of stateful objects.
We think leaning on standard JavaScript features rather than inventing a custom syntax for setup logic is a big win.
In most cases, you use regular functions or standalone <template> when your code is not stateful.
Smooth Interoperability
If you lived through the migration from class-based components to hooks in the React ecosystem, you might be thinking "this stuff is cool, but there's no way I can use it, because it will take me forever to migrate all of my components to the new format, and I don't have the time for that."
That couldn't be further from the truth.
Because of the way Ember's rendering engine works, you'll be able to start using the new format right away, and it will interoperate seamlessly with all of your existing components.
Some examples:
- You can import an
.hbscomponent into a.gjsfile and invoke it directly. - You can put a
.gjscomponent in yourapp/componentsdirectory and it will be auto-imported into.hbscomponents. - You can put a
<template>in a component with the classic@ember/componentbase class and it will work. - You can interleave
.hbsand.gjscomponents in any "zebra-striping" configuration you want. This allows you to write new components using.gjsand interoperate perfectly with existing components. It also allows you to migrate any component in your hierarchy to.gjs. You don't need to think about whether your component is a "leaf" or anything like that before choosing to migrate.
.gjs component from an .hbs component, yield back to the .hbs component, have the yielded code invoke another .gjs component, which invokes an .hbs component. Any combination works.From the perspective of the Ember rendering engine, .gjs and .hbs components are just different implementations of the same low-level component protocol.
This is also true of components using @ember/component and @glimmer/component, which is why you can still interoperate classic components and Glimmer components today.
In the abstract, this may seem like a minor detail. But in practice, it means that you don't need to wait to have time for a big migration process to use the new .gjs format.
You can follow the installation instructions on any Ember app running Ember 3.28 or newer, and begin using the new format in new code, without worrying about interop.
Subtle Ember Wins
If you're a long-term Ember user, something that might not immediately jump out at you is the fact that this change makes it possible to write "helpers" as simple functions in the same file as the template.
This is more than just a nice ergonomic win: it means that "helpers" aren't really a thing anymore.
If you want to use a function in your template, you write a function in your component and call it.
If you want to extract it into another file, you move it into another file and import it.
.gjs format. But it's such a big improvement to the Ember programming model that I wanted to call it out.Coda: It's Polish Time
If the .gjs format works as far back as Ember 3.28, why are we calling it a "Polaris" feature?
The truth is: while .gjs has worked for quite some time now, the new format regressed on ergonomics when it first landed.
In order to make the .gjs format feel like a clear improvement, we needed to invest in solid developer tooling, clear documentation, and making it straight-forward to use most add-ons in a <template>.
It also took some effort to get .gjs and .gts support into GitHub's syntax highlighter and to implement support for other popular syntax highlighters.
The bulk of those problems are now resolved, and I personally would recommend using .gjs for new components in modern Ember apps without much reservation.
The next step is to smooth out the experience of migrating existing components to the .gjs format.
This includes:
- solid codemods
- inclusion in all popular syntax highlighters by default
- clear documentation of
.gjsusage in the vast majority of maintained addons
Coordinating that sort of polish effort across the ecosystem is why we have "editions," and the .gjs format is one of the primary pillars of the Polaris Edition.
But the syntax itself is already stable (and has been for years at this point). If you start using .gjs in your Ember app, you can trust that the syntax will remain stable.
Adopting .gjs right now means you're a pioneer. It means you're willing to put up with some ergonomic growing pains in exchange for being one of the first people who get to experience the future of Ember. It means you're willing to experience a feature that is not completely polished so that you can help make the future more hospitable for everyone else.
That's how I like to roll in my personal projects.
That said, I think it makes a lot of sense for projects with full time teams to wait for fully polished features before adopting them.
Either way, if you're still reading, you're almost certainly the kind of person who should play around with the new format, at least for a weekend project or with Limber.
Have fun! And let's work together to build a better future for all of us.