Ember Octane: Airtable Time

This post is the fourth in a series on building an Ember application HTML-first. In this series, we're going to build the EmberConf schedule application from the ground up.
- Let's Go
- Components
- Pulling Out Data
- Airtable Time ← This post
- Cleaning Things Up
- Adding More Pages
- Polishing: Server-Side Rendering, Prerendering and Code Splitting
In the last post, we pulled out our schedule data into a JSON file, and used fetch to load the data into our schedule.
In this post, we'll create an Airtable spreadsheet to store the data, and then load it into our Ember app.
Let's take a look at an example event in our events.json:
{
  "id": "recvSqXajPl7zLQ1R",
  "created_at": "2016-10-30T21:41:29.000Z",
  "updated_keys": [],
  "fields": {
    "name": "EmberQuest: Building an Octane Role Playing Game",
    "speakers": ["Dan Monroe"],
    "description": "Journey with me as I discuss how Ember Octane made building an RPG easier. There are many challenges to make a playable game; rendering maps, moving the player and monsters, player inventory, combat. Never fear, we have magic on our side! \n\nWe'll use a Glimmering component for the main viewport, mini world map, Path Finding, and Fog of War. The magic of Ember-Concurrency will help drive moving and combat. The wizardry of Ember-Auto-Import will allow the use of Konva to draw on our HTML5 canvas. \n\nTogether, with the magic Octane sword I've named Tracked, we'll level-up and complete our EmberQuest!\n\n",
    "day": "Wednesday",
    "end_time": "11:50am",
    "start_time": "11:25am",
    "slides_url": "https://drive.google.com/file/d/1LNOhvq9PQaQeefh33PtIrnaU5kMRD5yA/view"
  }
}
Let's zero in on the fields section, which we used in our Event component.
namethe title of the talkspeakersa list of speaker namesdescriptiona long text description of the talk (we haven't used this yet)daywhich day of the week the talk is onstart_timethe start time of the talkend_timethe end time of the talkslides_urlan optional link to the slides for the talk
0. Create an Airtable Account
To get started, you'll need to create a new Airtable account.
The quickest way to get going is to create an account with your Google account, and then select "personal" in the first screen after signup.
Name your workspace "Events Tutorial" and feel free to skip the video tutorial. You can come back to it later by clicking this link.
1. Set Up Airtable
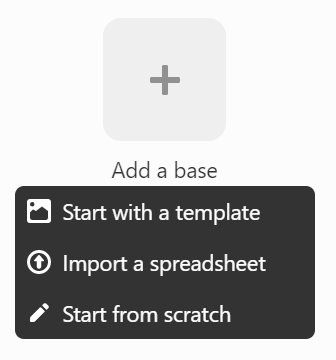
Next, you'll create an Airtable spreadsheet, which is called a "base" in Airtable terminology (think "database").
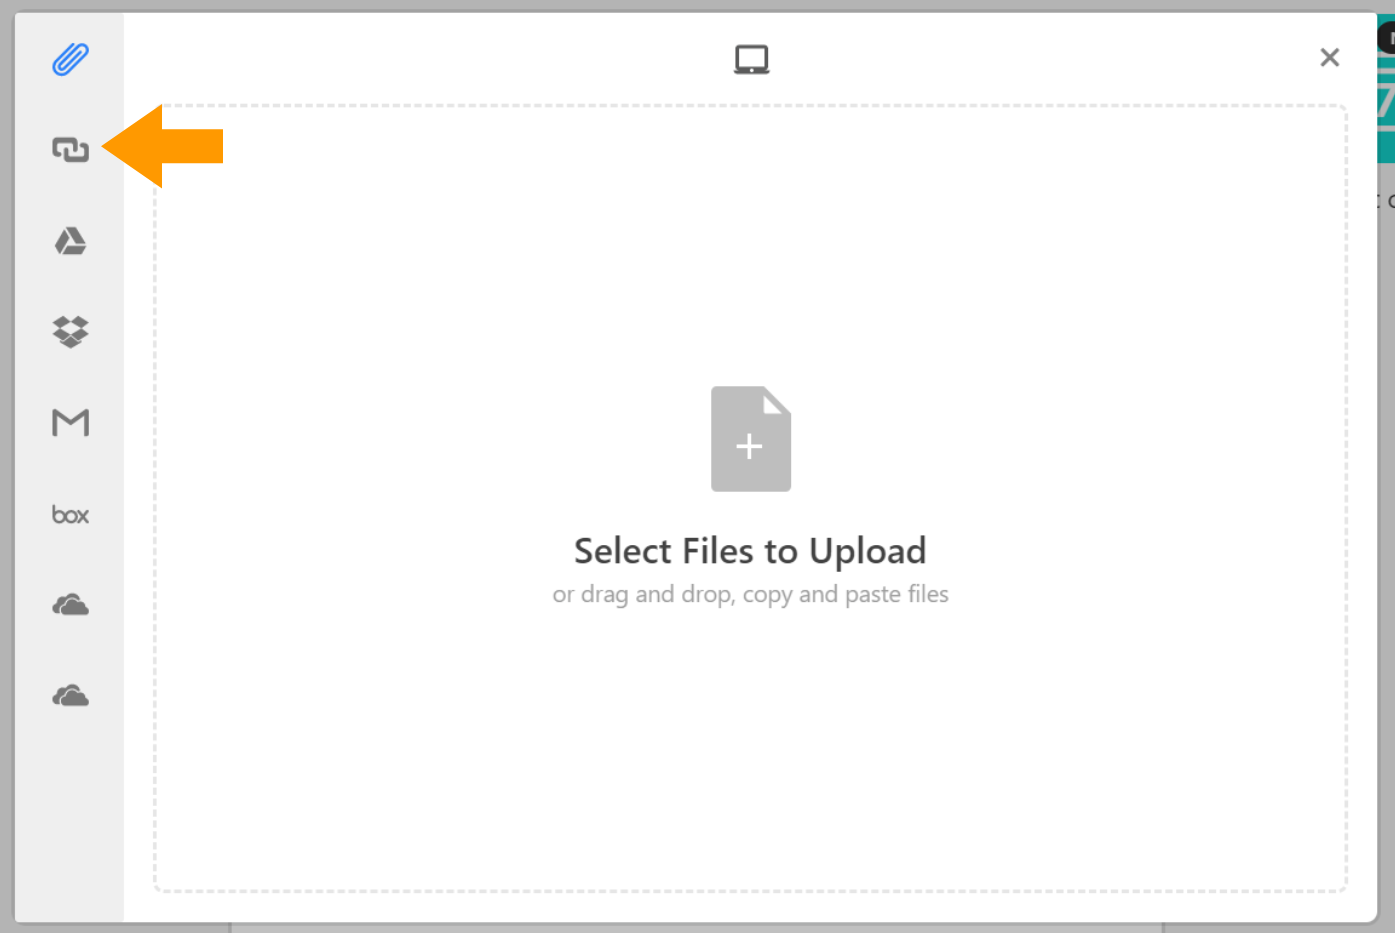
To make this easier, I've created a CSV file that you can import. Click "Add a Base" and then "Import a spreadsheet".
Then select "Choose a .CSV file", and when the window pops up, click on the link icon on the left of the Window.
Paste this URL into the URL box:
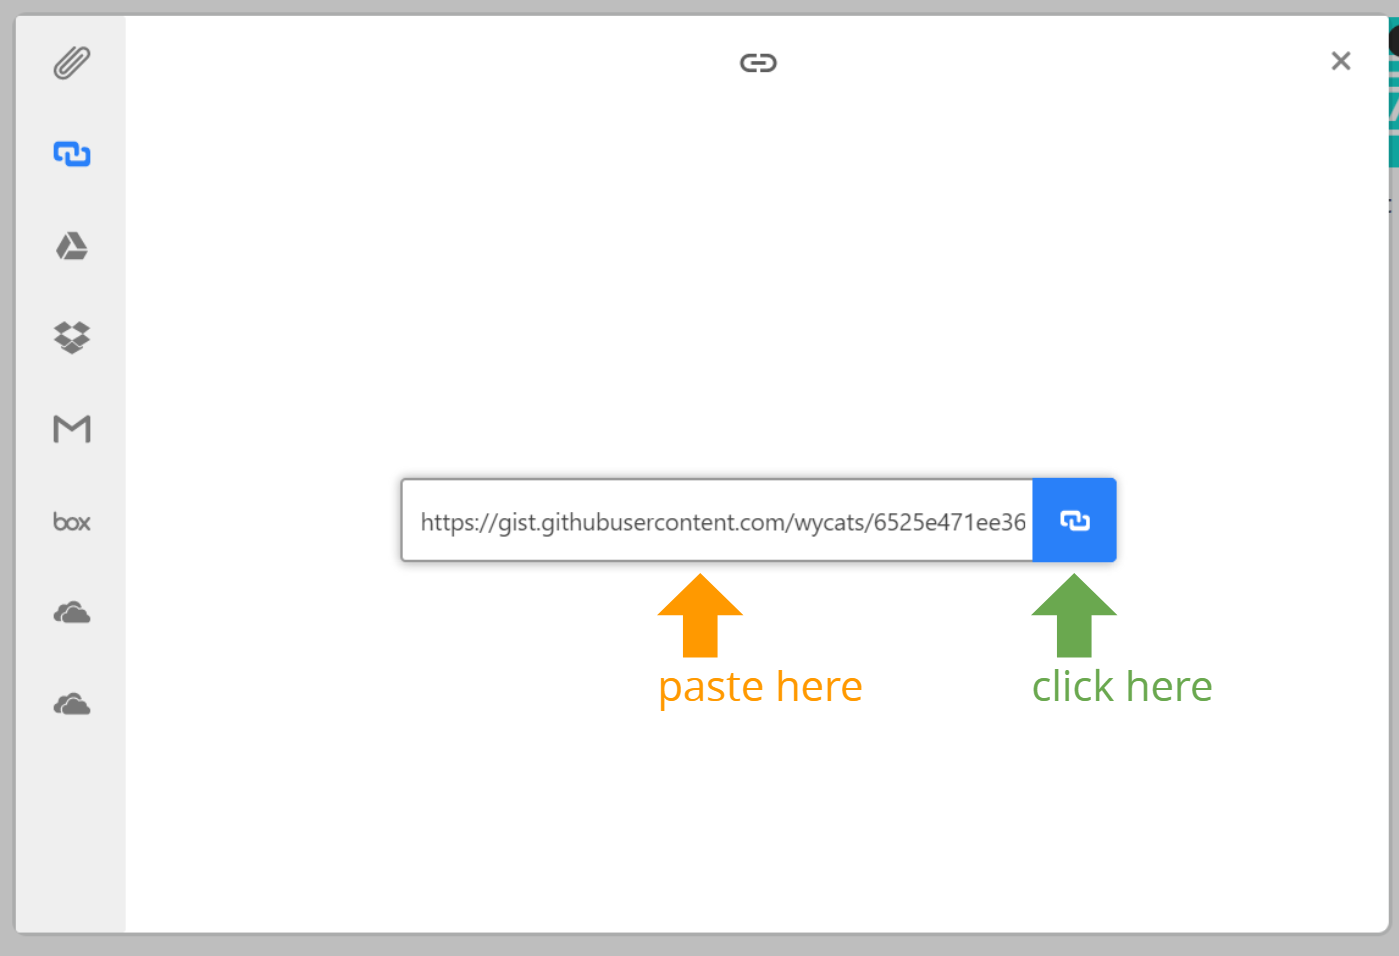
Then click the upload button and name your new base events (lowercase).
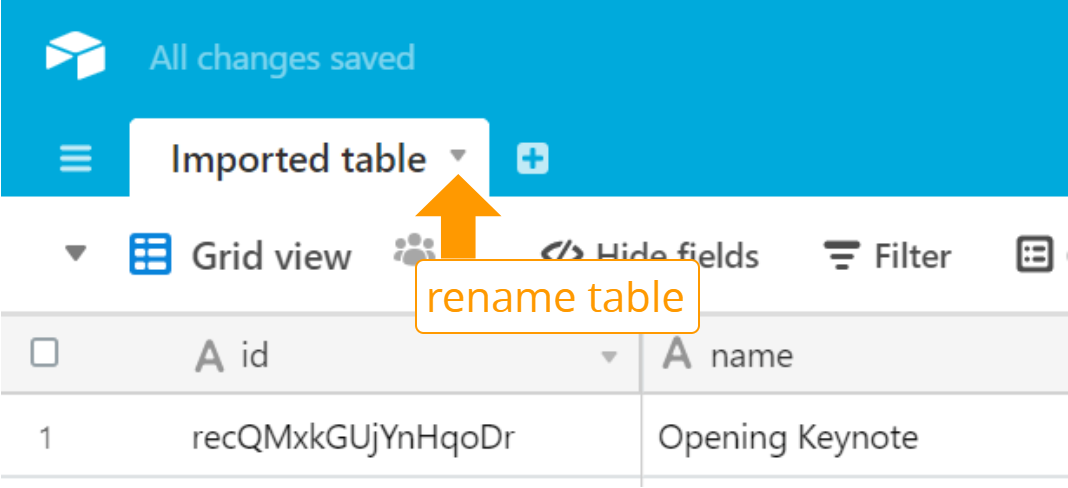
Next, we'll do a little clean up. First, rename the table to events.
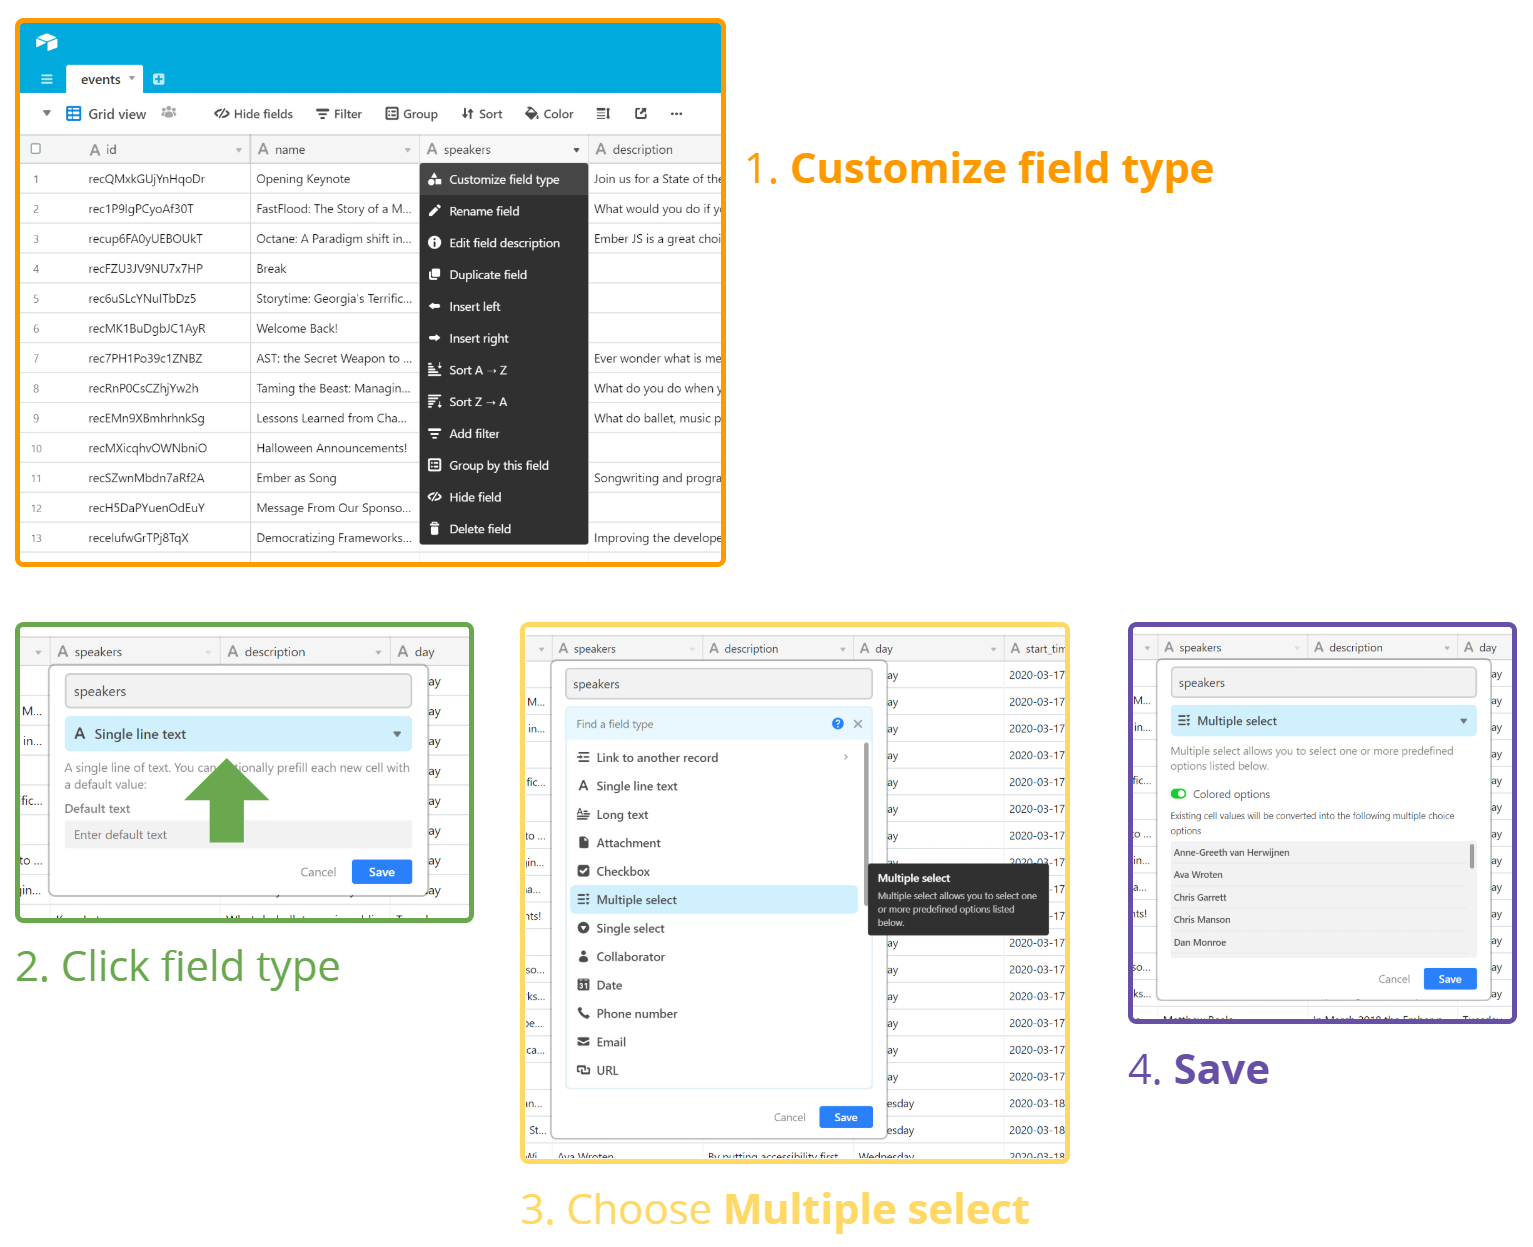
Next, we'll want to change the data types of speakers, start_time and end_time. Let's start by changing the data type of the speakers field. It came in as a comma-separated list, and we want to turn it into an Airtable list (called "multiple select" in Airtable).
Here's how to do that.
Now we're going to repeat the process for start_date and end_date, but this time we're going to choose the date type. Follow the same steps as before, and select the "date" data type. After doing that, make sure you enable the "Include a time field" toggle. A date without a time is not very useful for our schedule after all.
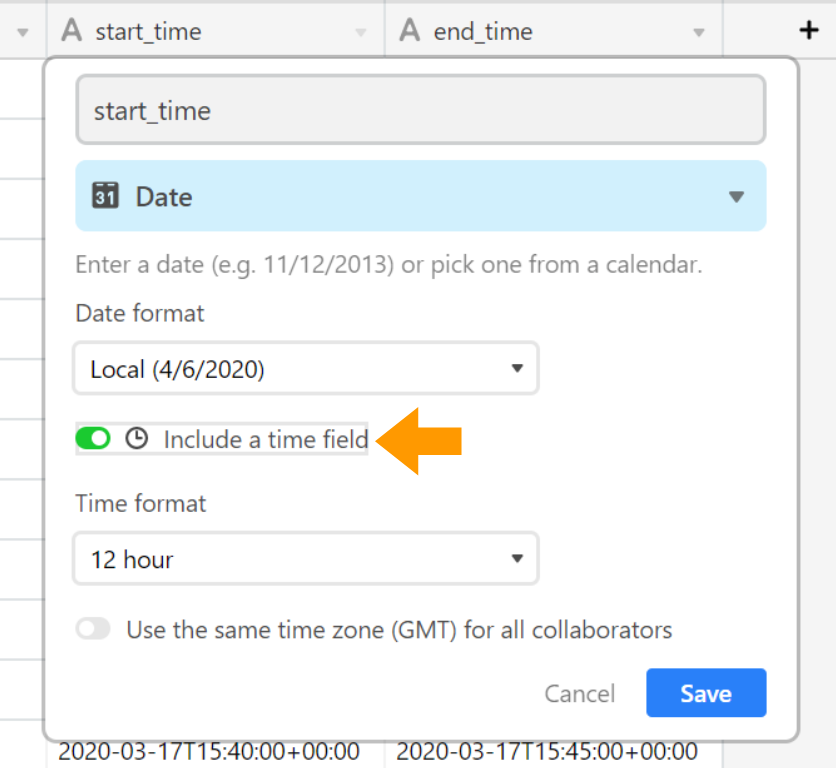
Repeat the process for end_time. Finally, change the description column to "long text".
And here's what it should look like when you're all done.

Pretty cool, no?
2. Airtable Docs
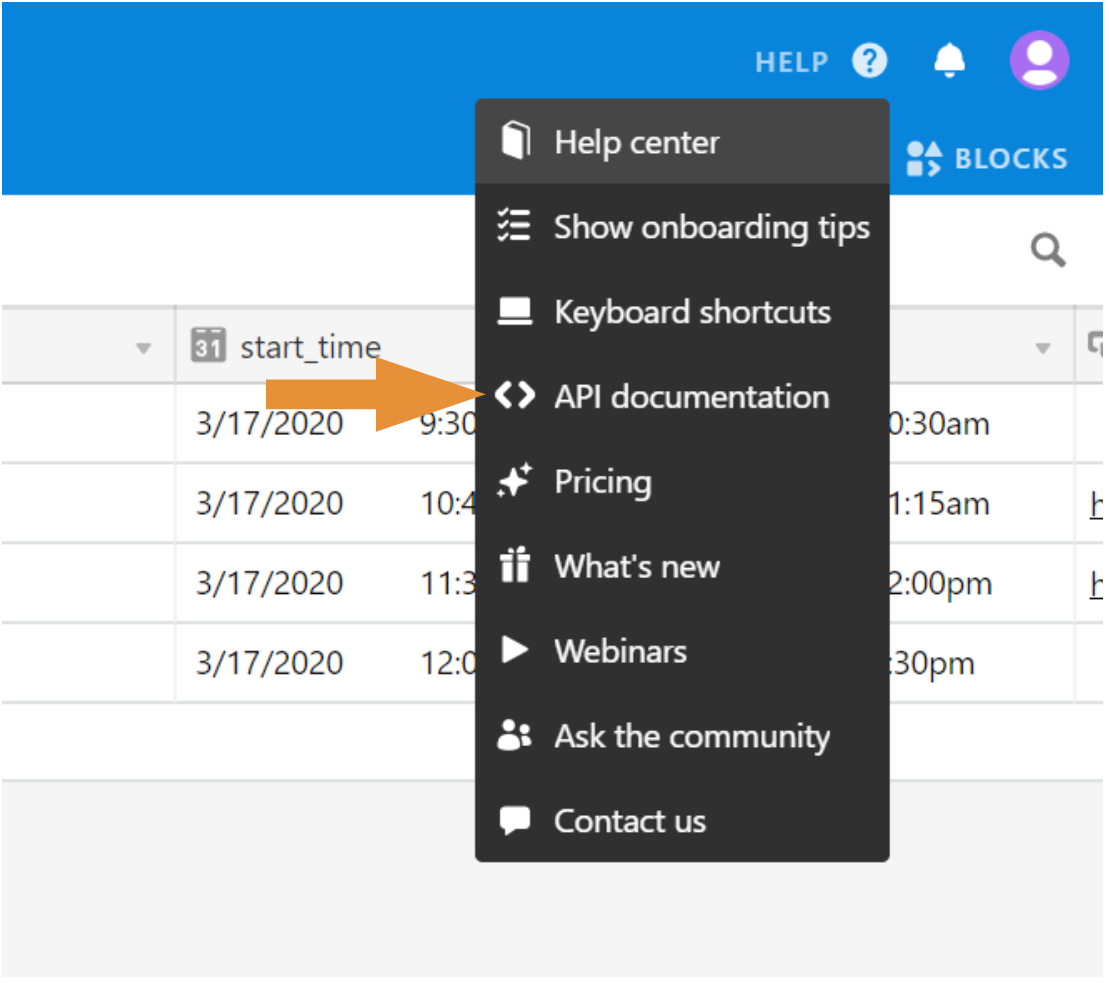
The coolest thing about Airtable is that their API docs are tailored for the table that you created. First, click on the API documentation in the help section.
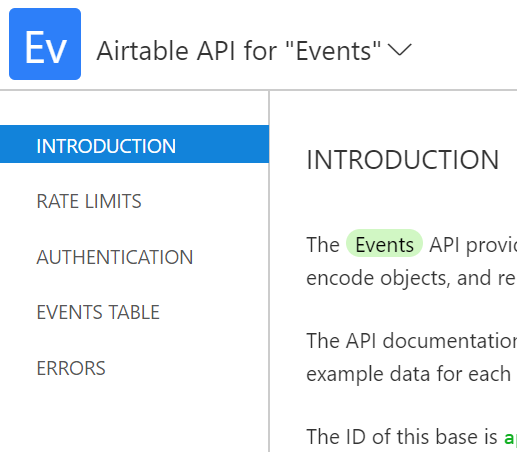
The API docs that show up aren't just generic docs for all of Airtable. Instead, they're customized for your specific setup.
Sidebar: Set Up API Key
In order to use our Airtable spreadsheet as an API, we will need generate an API key. Click on the "authentication" section on the documentation sidebar and then follow the "account" link.
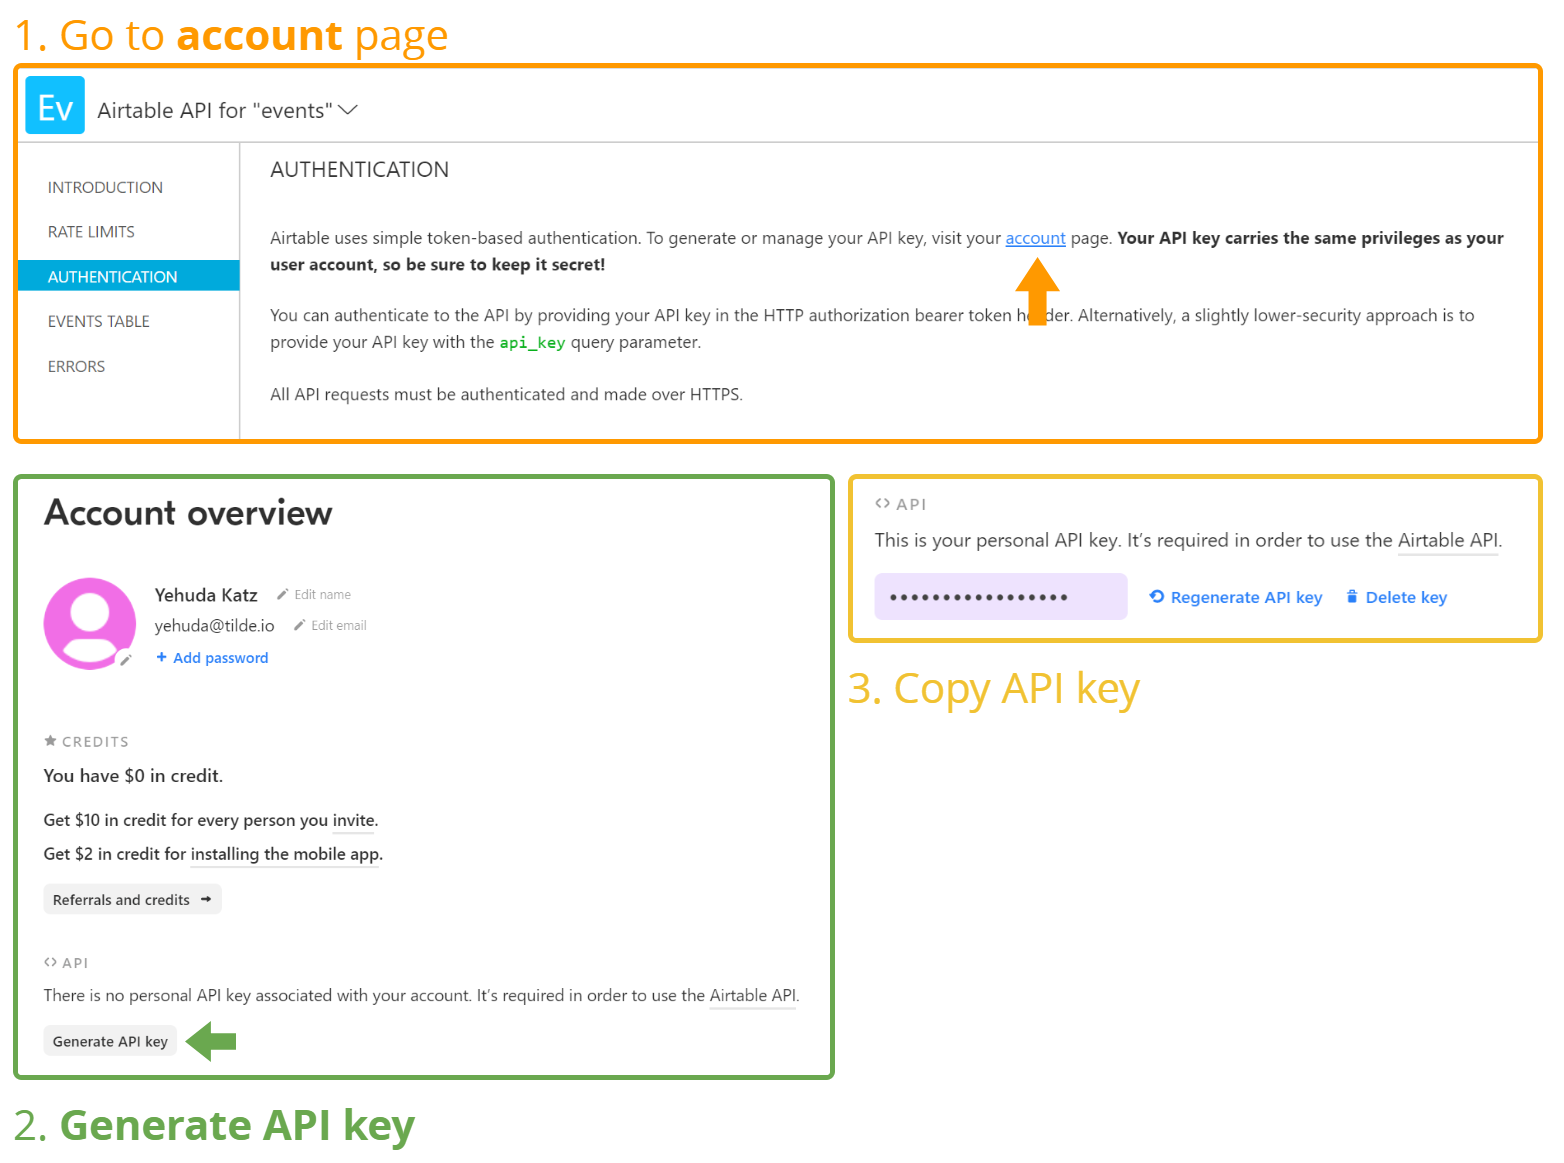
Next, click the "Generate API key". After a few seconds, Airtable will generate an API key for you. If you want, you can copy the API key from this section, but you can also get it directly from the documentation later.
Onward
After that detour, let's go back to the documentation. Click on "Events Table" and then "List Records", and you'll get documentation for the Events table we created.
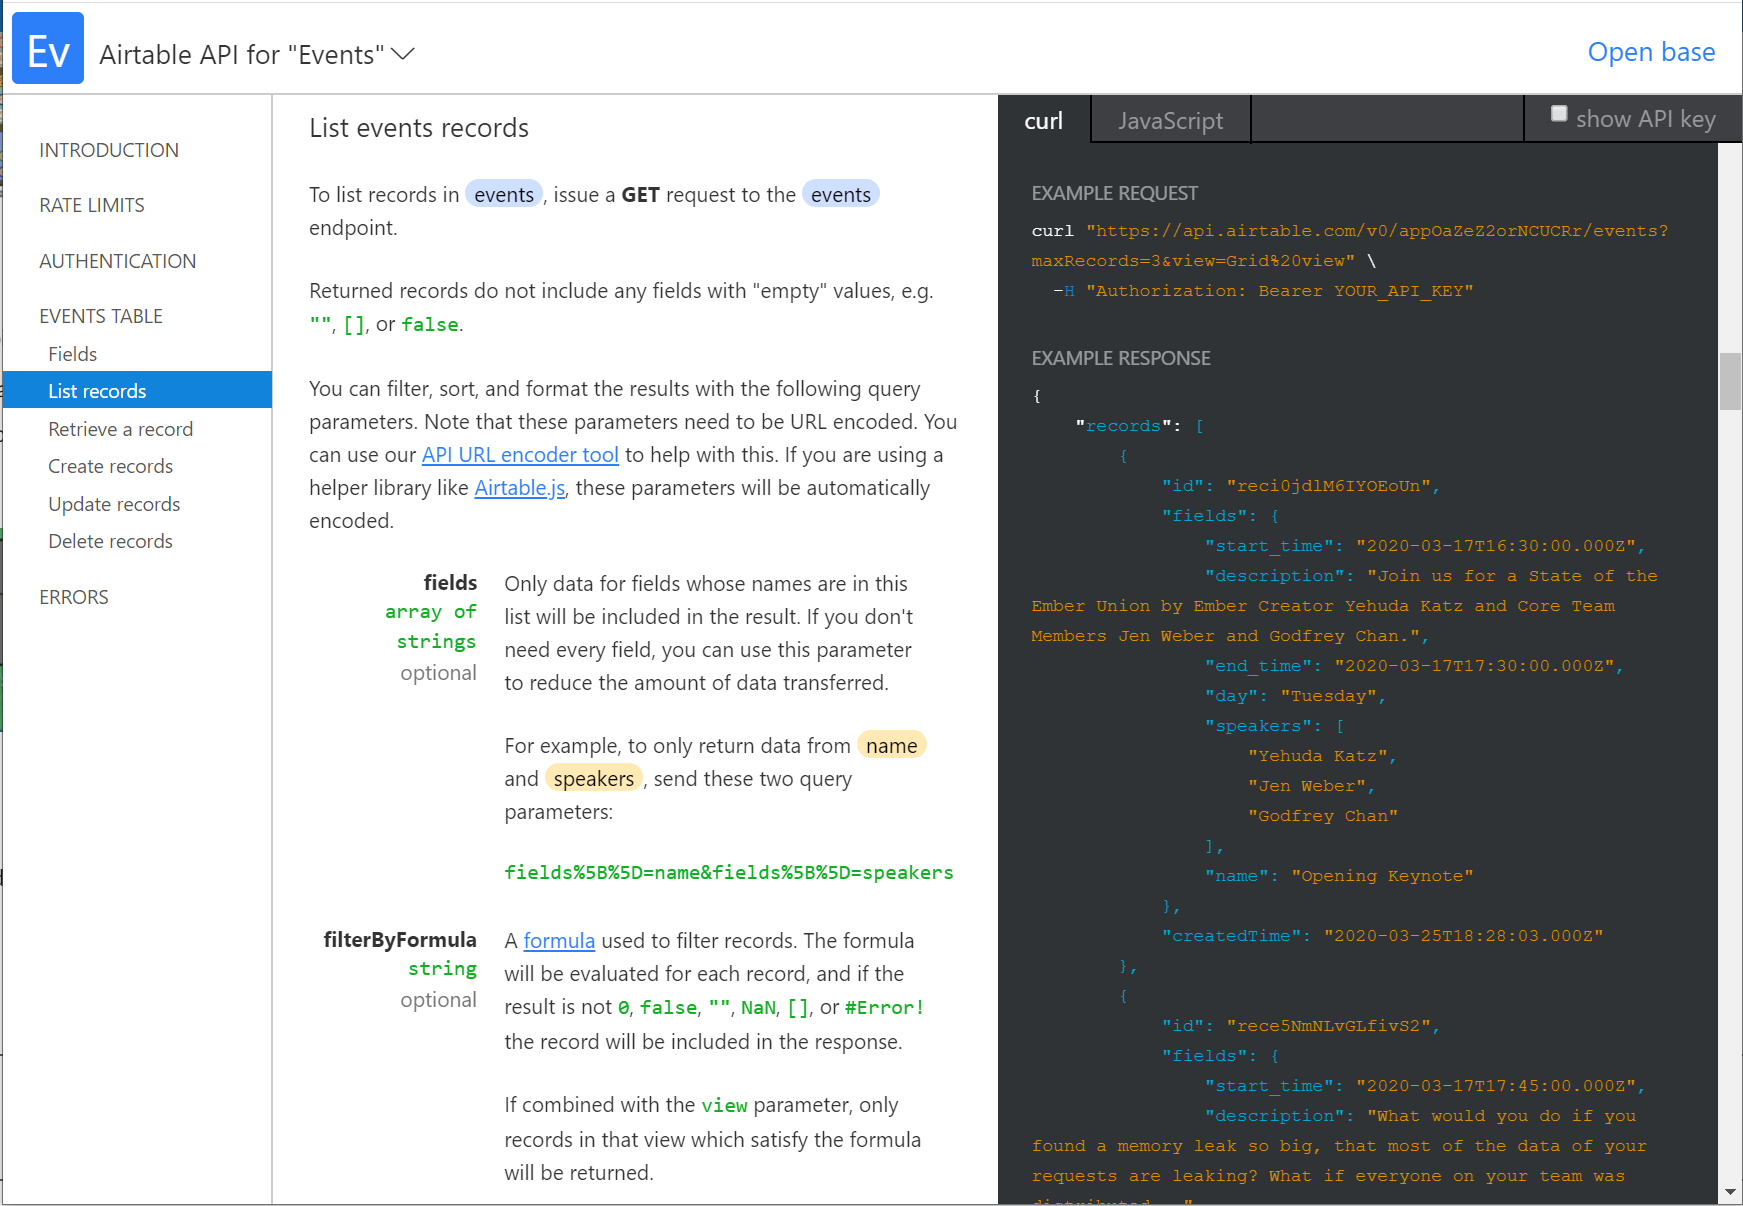
The "JavaScript" section describes how to use their Node-based JavaScript library, which is a lot more involved that what we need here. Instead, we'll use the "curl" tab, and use the information in that tab to create the fetch command that we need.
3. Updating the Route
Now that we have Airtable set up, we want to change the data source for our application from our local events.json file to Airtable.
As a quick reminder, the route in Ember is responsible for getting the model and giving it to the application template.
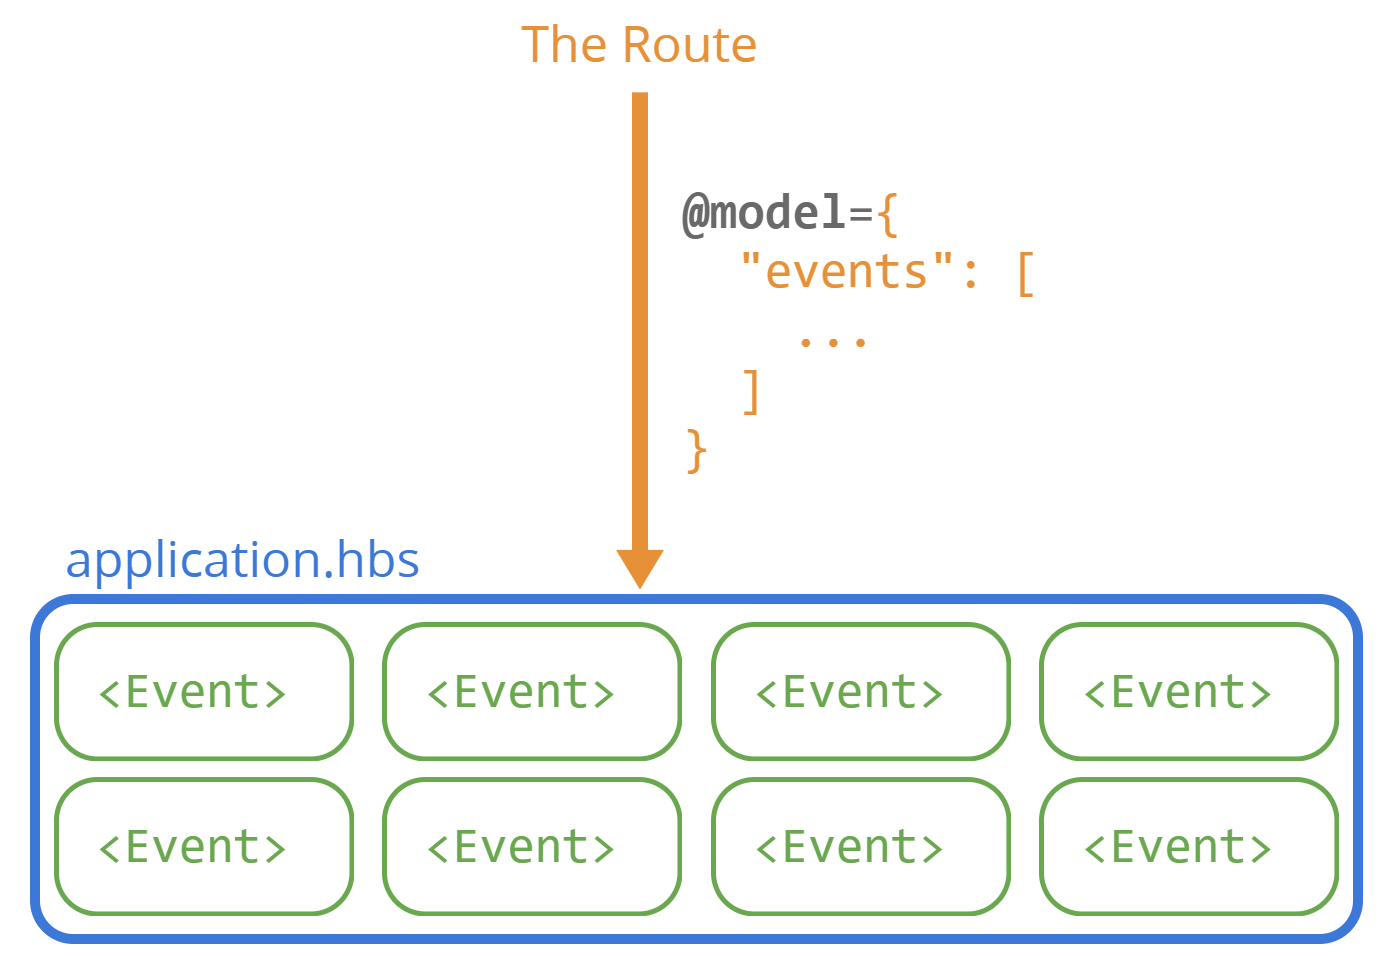
In the last post, our route got its model from the events.json file. Now, we want to change our application's data source to Airtable. We'll get our model from Airtable, rather than an events.json file.
First, let's remind ourselves what it looked like to fetch the events from the events.json file.
import Route from "@ember/routing/route";
import fetch from "fetch";

export default class ApplicationRoute extends Route {
  async model() {
    let response = await fetch("/events.json");
    let data = await response.json();
    return data.events;
  }
}
In its simplest form, the fetch function takes a URL and gives back an response that you can await.
The Airtable documentation tells us to make a request that looks like this:
curl "https://api.airtable.com/v0/appOaZeZ2orNCUCRr/events?maxRecords=3&view=Grid%20view" \
  -H "Authorization: Bearer YOUR_API_KEY"
Don't be intimidated by this curl stuff. The first part after the word curl is the URL, and the part after -H is the "headers", which is a bunch of extra information that you can send along with the URL.
To convert the curl docs to fetch, we're going to use this awesome web app that does the work for us.

And here's what it looks like to translate the Airtable docs to fetch.
import Route from "@ember/routing/route";
import fetch from "fetch";

export default class ApplicationRoute extends Route {
  async model() {
-   let response = await fetch("/events.json");
+   let response = await fetch(
+     "https://api.airtable.com/v0/appOaZeZ2orNCUCRr/events?maxRecords=100&view=Grid%20view",
+     {
+       headers: {
+         Authorization: "Bearer YOUR_API_KEY"
+       }
+     }
+   );
    let data = await response.json();

-   return data.events;
+   return data.records;
  }
}
A couple of things.
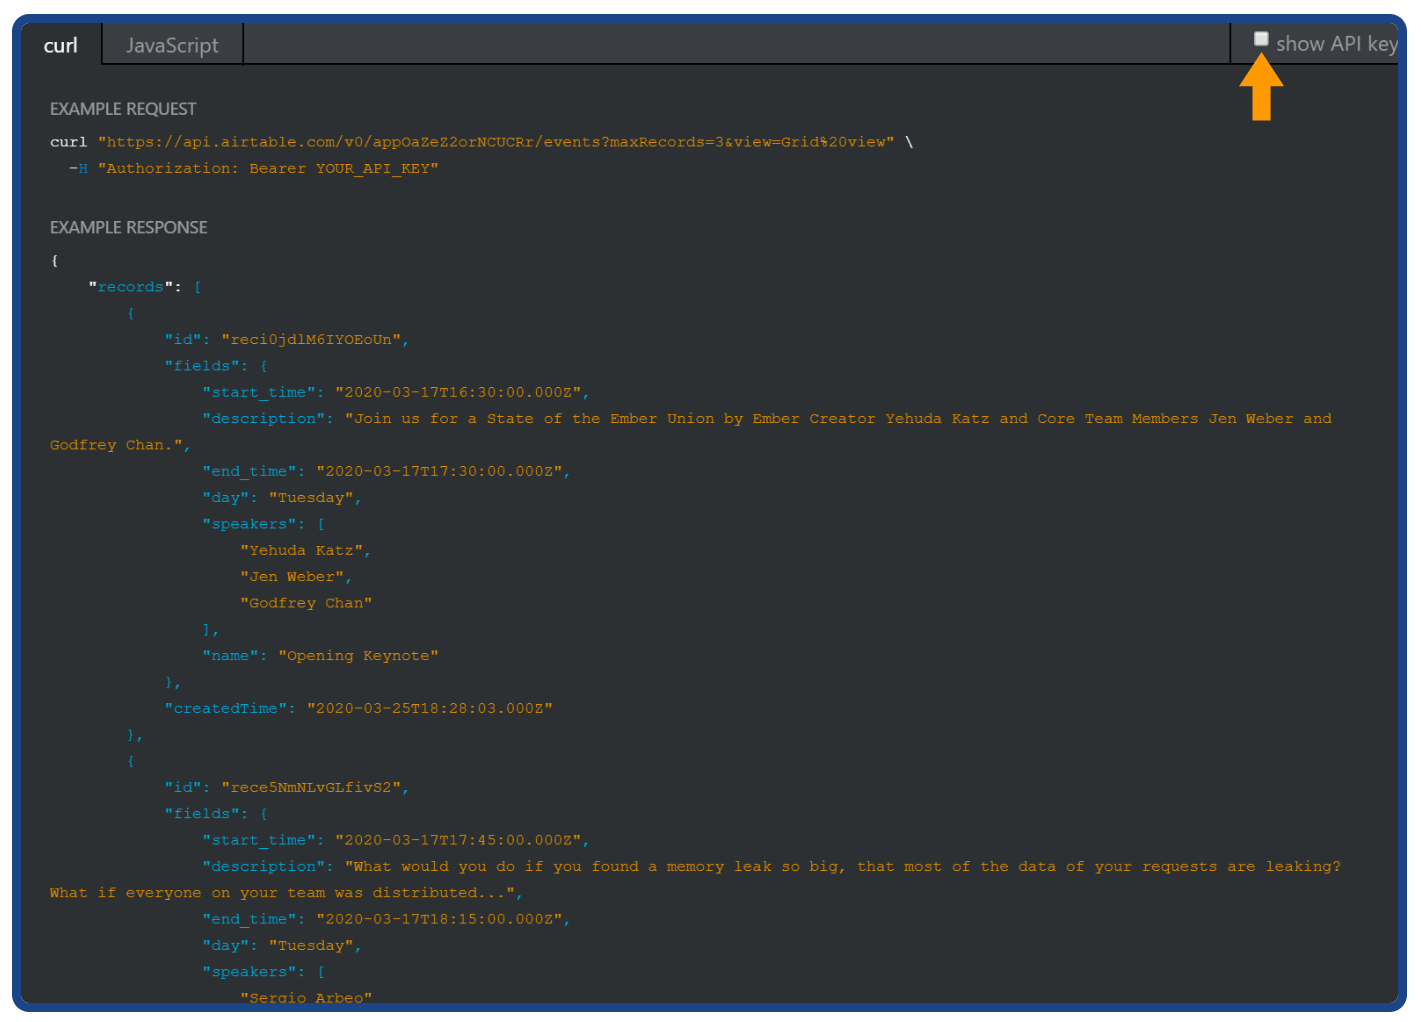
- Don't leave "YOUR_API_KEY" in the code. Instead, click on "show API key" in the upper right side of the documentation and the API key will appear in the curl documentation (if you don't see "show API key", go back to "Sidebar: Set Up API Key" and make sure you did that step properly).
- Airtable defaults to giving you 3 records at a time, which is way too few for us. Change
maxRecords=3in the URL tomaxRecords=100. The biggest number you can pick is 100. Read Airtable's docs for more information. - Make sure to change
data.eventstodata.records. In our originalevents.json, the top-level key in the JSON wasevents. The Airtable documentation shows us that the top-level key in their API isrecords.
The "example response" in the Airtable docs is very useful. Pay close attention to it if you're trying to understand what you're expecting to get back from the server.
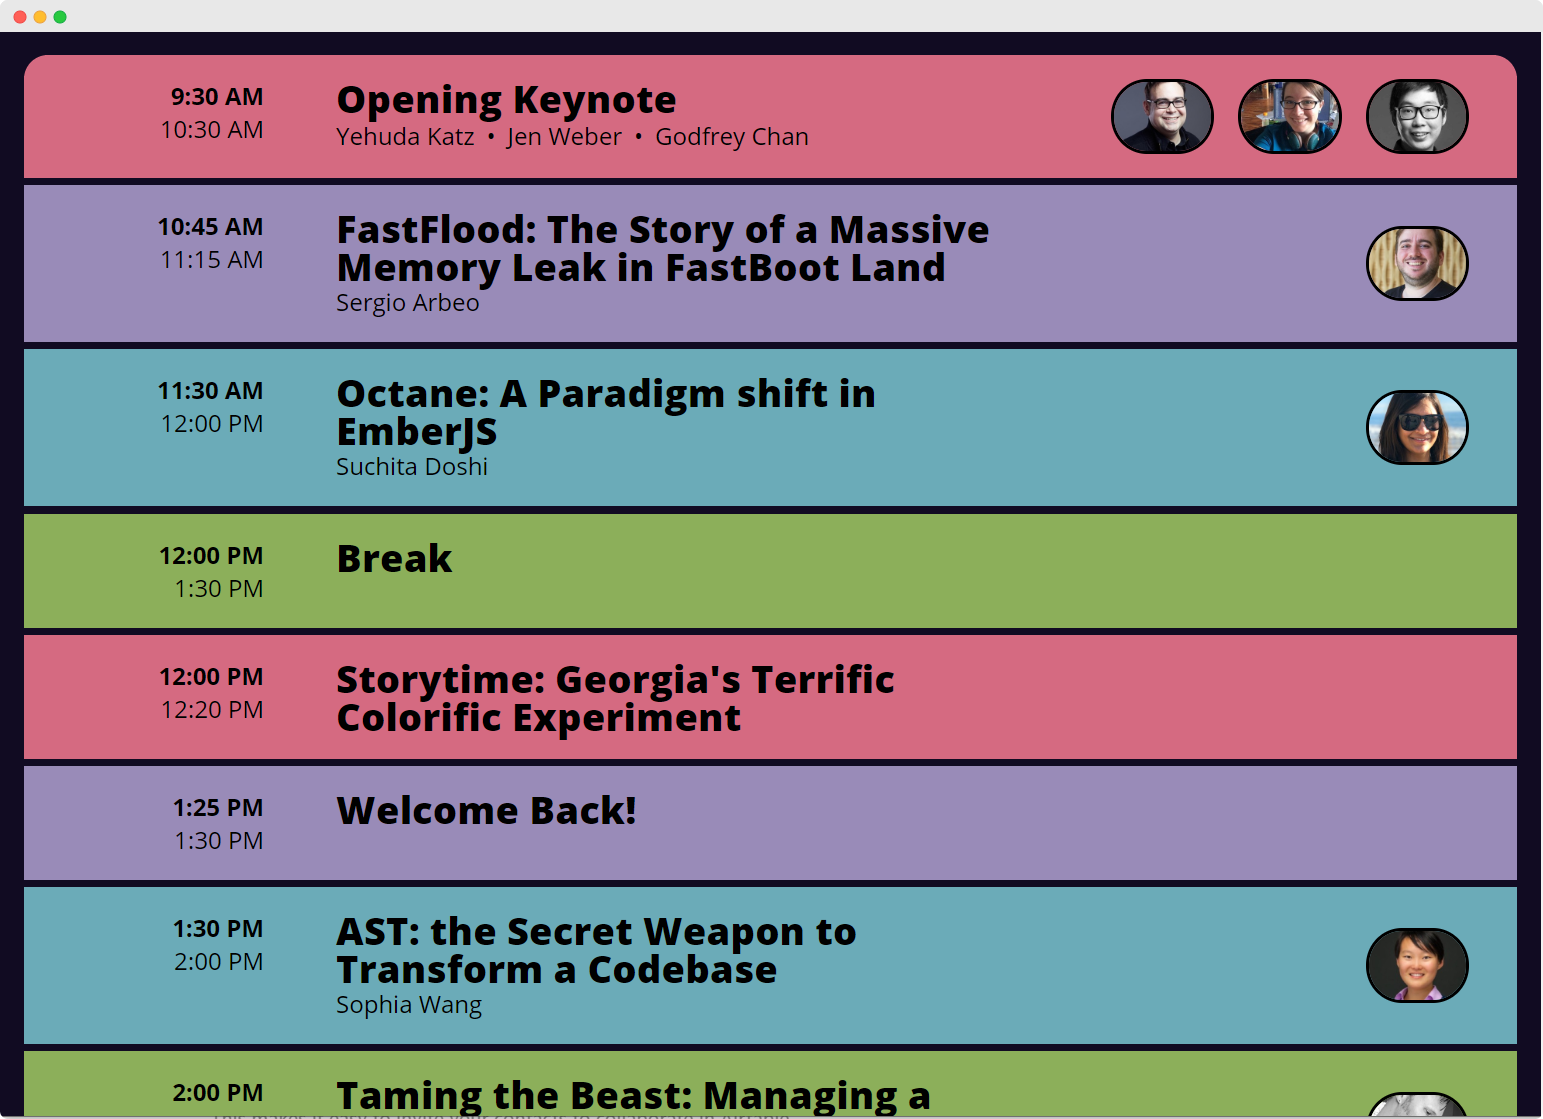
If we did everything right, and reload the page, we'll get something like this.
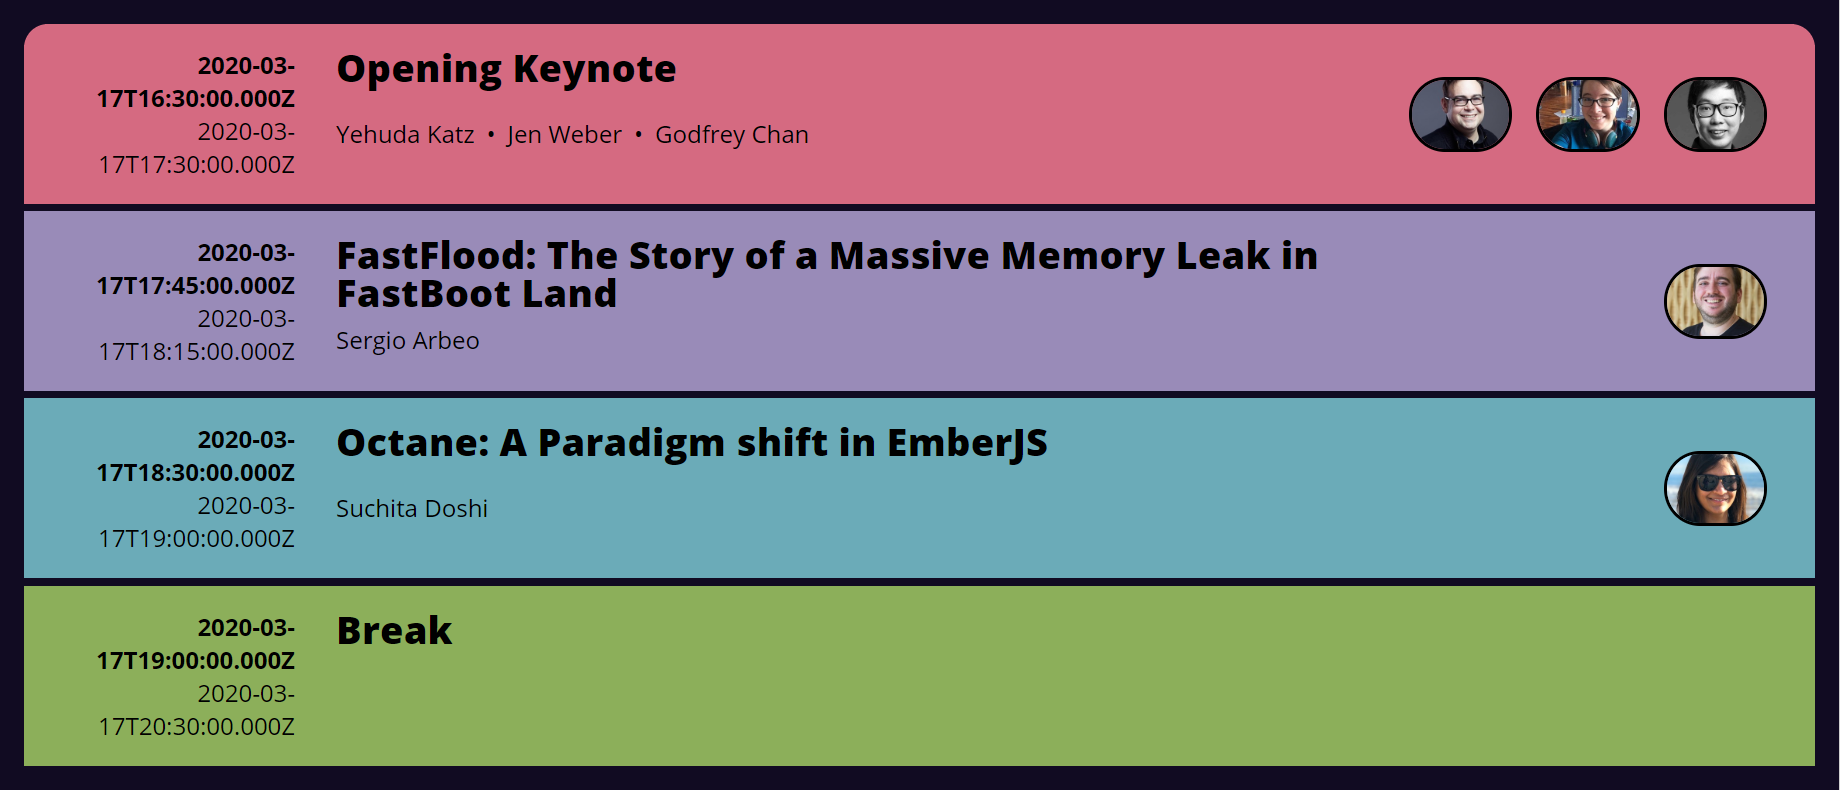
4. Formatting Timestamps
This looks pretty good, except that the times on the left side aren't quite what we wanted. Instead, we got an "ISO 8601" formatted date, which doesn't work at all for human readers.
We know it's an "ISO 8601" date because the Airtable docs say so in the "fields" section.

First, we need to figure out how to take an ISO 8601 timestamp and turn it into a date. To figure that out I googled parse iso 8601 javascript, and the top result is an MDN article for Date.parse, which seems promising.
The first part of the documentation says that they don't recommend using
Date.parse, but later on in the documentation, it says that it's safe to useDate.parsefor ISO 8601 timestamps.
I tried it out in the developer tools with the string I got back from the Airtable API.

This isn't what we need, but it's progress!
The next question we need to answer is how to convert a timestamp into a useful, human-readable string. These days, the built-in Intl API is the way to convert numbers and dates into human-readable results. For dates, we want to use the appropriately named Intl.DateTimeFormat.
The way that API works is that you first construct a new formatter.
let formatter = new Intl.DateTimeFormat(<LOCALE>, <OPTIONS>)
And then you use the formatter to format the date. If we don't pass any options to new Int.DateTimeFormat, you get this:
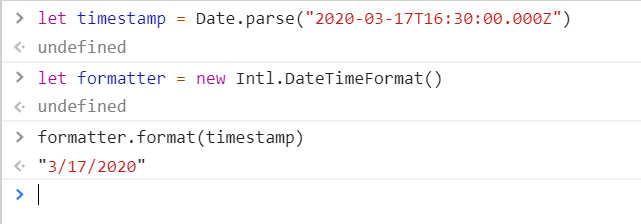
What we're looking at is the date represented by the timestamp, formatted according to the rules of our current locale. For me, that's en-US.
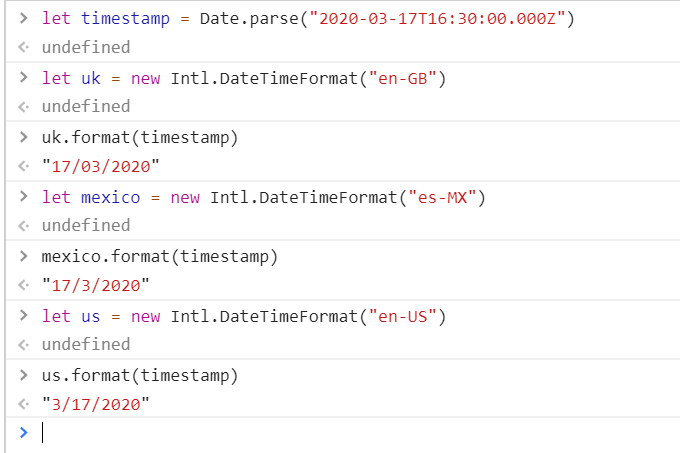
Let's see what happens if we pass in other locales.
Ok, this is cool and all, but we need to "9:30 AM" not "3/17/2020".
That's where the second parameter to new Intl.DateTimeFormat comes in. It took me a little sleuthing, but check this out.
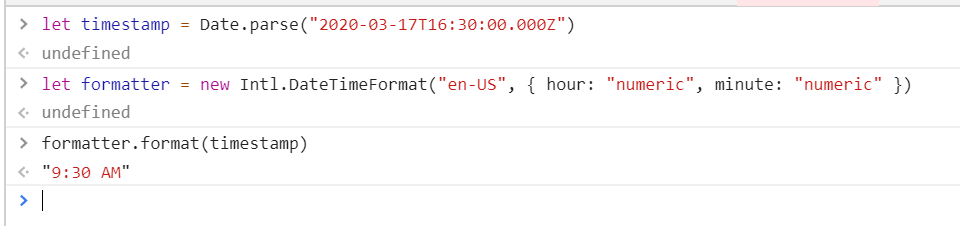
Boom! We got it!
5. Creating a Helper
To use it, all we need to do is create a helper that takes in one of these weird timestamps that we got from Airtable and format it using the Intl API.
Let's generate a helper. We'll call it format-time.
$ ember g helper format-time
Just like in the last post, Ember gave us a new helper, this time in app/helpers/format-time.js.
import { helper } from "@ember/component/helper";

export default helper(function formatTime(params /*, hash*/) {
  return params;
});
Let's update our Event component to call format-time and throw a debugger into the function.
First, app/components/event.hbs.
<li class="event">
  <div class="time">
-   <p>{{@start}}</p>
+   <p>{{format-time @start}}</p>
-   <p>{{@end}}</p>
+   <p>{{format-time @end}}</p>
  </div>
  <h1>{{@title}}</h1>
  <h2>
    <ul>
      {{#each @speakers as |speaker|}}
      <li>{{speaker}}</li>
      {{/each}}
    </ul>
  </h2>
  <ul class="images">
    {{#each @speakers as |speaker|}}
    <li>
      <img src="https://emberconf.com/assets/images/people/{{anchorize speaker}}.jpg">
    </li>
    {{/each}}
  </ul>
</li>
And then, app/helpers/format-time.js.
import { helper } from "@ember/component/helper";

export default helper(function formatTime(params /*, hash*/) {
+ debugger;
  return params;
});
Reload the page with the developer tools open. We'll find ourselves dropped into the console with the browser paused where we placed the debugger.

Cool, it worked. We can update the helper with this code.
import { helper } from "@ember/component/helper";

export default helper(function formatTime(params /*, hash*/) {
- debugger;
- return params;
+ let time = Date.parse(params[0]);
+ let formatter = new Intl.DateTimeFormat("en-US", {
+   hour: "numeric",
+   minute: "numeric"
+ });
+ return formatter.format(time);
});
Reload the page, and voila!
In the next post, we'll clean things up a bit and break up the schedule up so that each day is its own section.