Ember Octane: Components

This post is the second in a series on building an Ember application HTML-first. In this series, we're going to build the EmberConf schedule application from the ground up.
- Let's Go
- Components ← This post
- Pulling Out Data
- Airtable Time
- Cleaning Things Up
- Adding More Pages
- Polishing: Server-Side Rendering, Prerendering and Code Splitting
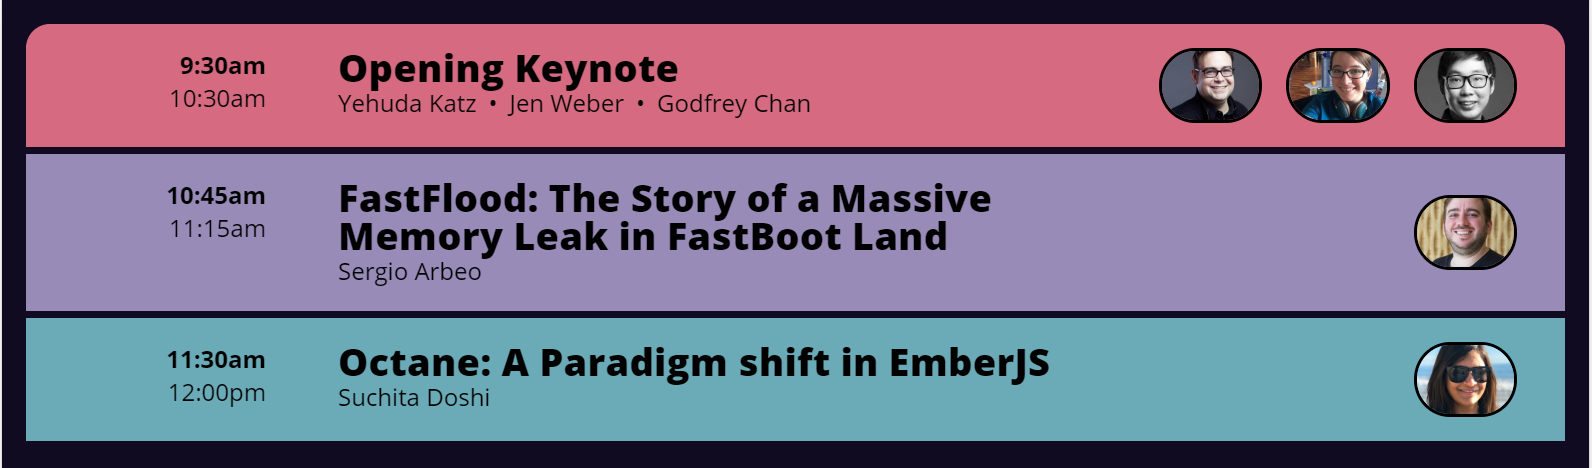
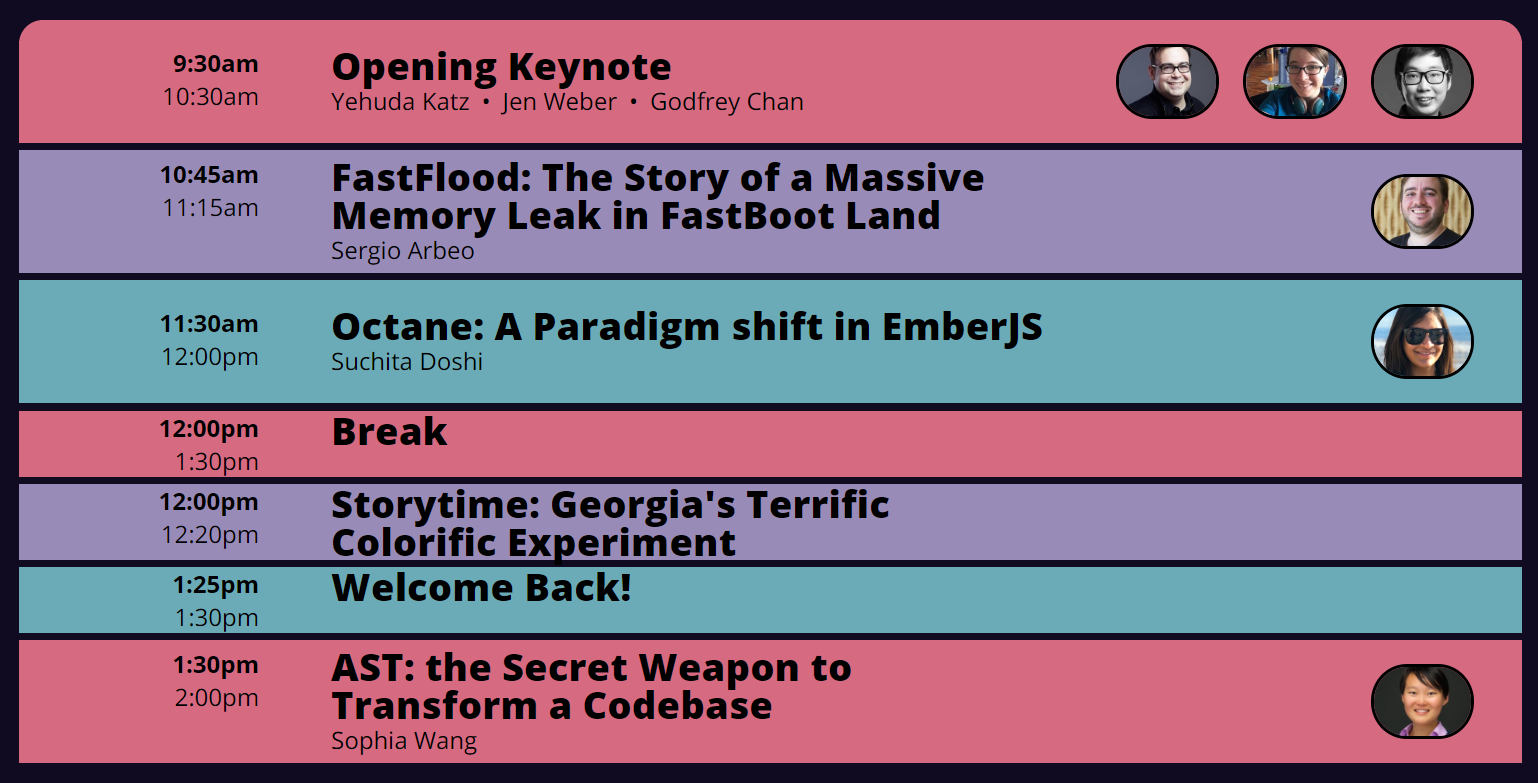
In the last post, we created a website for a conference schedule and deployed it.
But there's quite a bit of duplication in the HTML that we wrote. We have three copies of the same HTML, and if we flesh it out to describe the entire schedule, there will be a massive amount of duplication. Whenever we make small changes to the HTML structure, we'll have to change a ton of copies.
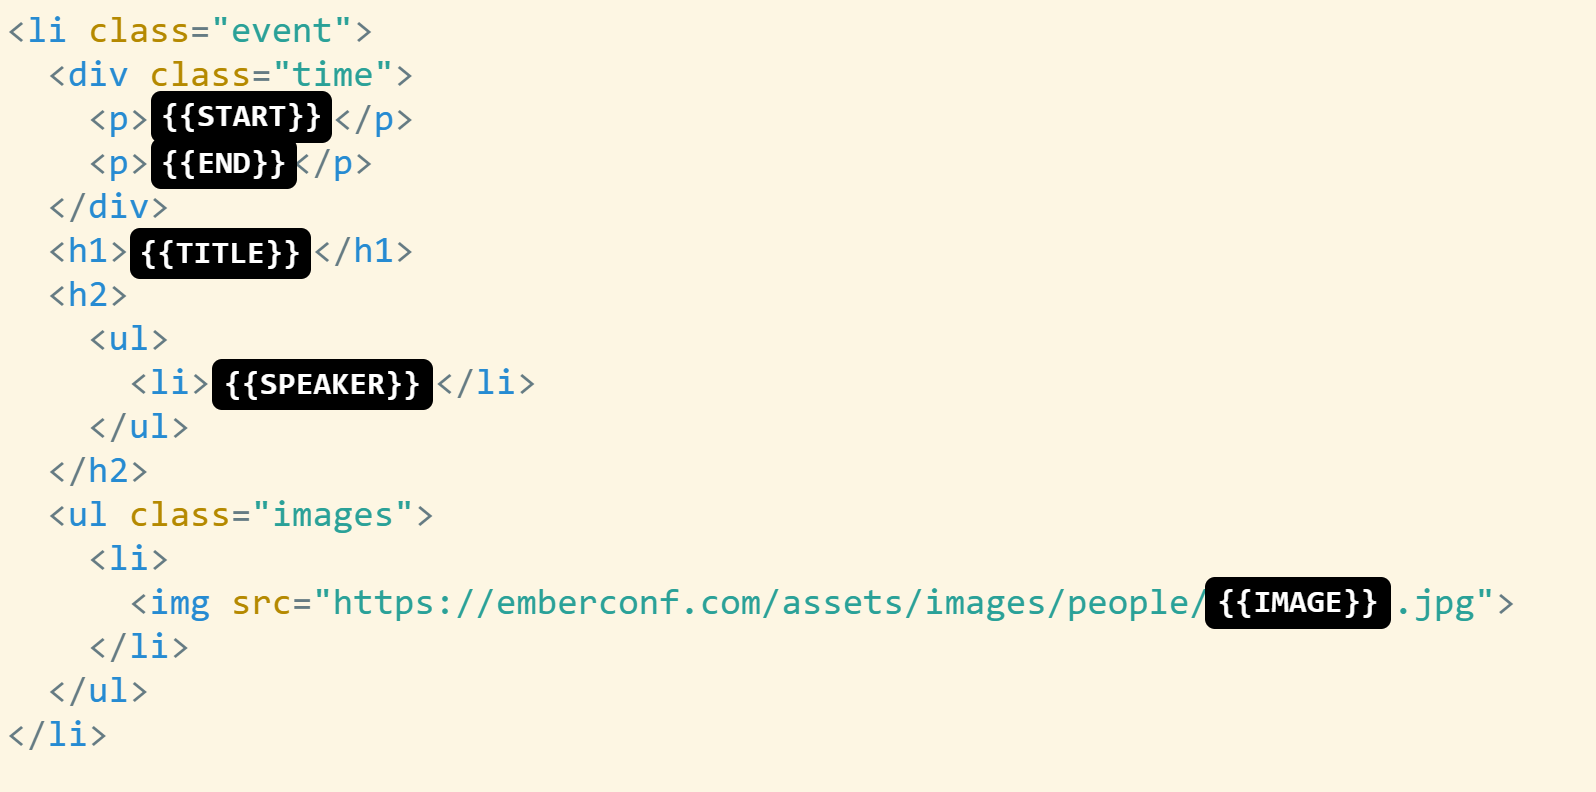
Let's take a look at the HTML for the FastFlood talk:
<li class="event">
  <div class="time">
    <p>10:45am</p>
    <p>11:15am</p>
  </div>
  <h1>FastFlood: The Story of a Massive Memory Leak in FastBoot Land</h1>
  <h2>
    <ul>
      <li>Sergio Arbeo</li>
    </ul>
  </h2>
  <ul class="images">
    <li><img src="https://emberconf.com/assets/images/people/sergio-arbeo.jpg"></li>
  </ul>
</li>
And the Paradigm Shift talk:
<li class="event">
  <div class="time">
    <p>11:30am</p>
    <p>12:00pm</p>
  </div>
  <h1>Octane: A Paradigm shift in EmberJS</h1>
  <h2>
    <ul>
      <li>Suchita Doshi</li>
    </ul>
  </h2>
  <ul class="images">
    <li><img src="https://emberconf.com/assets/images/people/suchita-doshi.jpg"></li>
  </ul>
</li>
These two chunks of HTML look really similar. Most of the content is the same, but there are a few spots where the talks are different.
1. Remove Duplication With Components
You can visualize the two snippets of HTML this way. The black boxes show the few places where the HTML for each talk is different.
What we want is the ability to create a "template" for our talks. A template is kind of like Madlibs. Most of the details stay the same, but there are a few spots that can change each time it's used.
In Ember, a component is kind of like a custom HTML tag that looks a lot like like black box diagram we showed above.. Put this snippet of HTML in app/components/event.hbs.
<li class="event">
  <div class="time">
    <p>{{@start}}</p>
    <p>{{@end}}</p>
  </div>
  <h1>{{@title}}</h1>
  <h2>
    <ul>
      <li>{{@speaker}}</li>
    </ul>
  </h2>
  <ul class="images">
    <li>
      <img src="https://emberconf.com/assets/images/people/{{@image}}.jpg">
    </li>
  </ul>
</li>
The variables in an Ember component are described by surrounding them in {{ and prefixing the variable name with @. A variable is a part of the component that can change (vary).
Now that we defined our component, we can use it in application.hbs.
<Event
  @title="FastFlood: The Story of a Massive Memory Leak in FastBoot Land"
  @start="10:45am"
  @end="11:15am"
  @speaker="Sergio Arbeo"
  @image="sergio-arbeo"
/>

<Event
  @title="Octane: A Paradigm shift in EmberJS"
  @start="11:30am"
  @end="12:00pm"
  @speaker="Suchita Doshi"
  @image="suchita-doshi"
/>
Because the component was defined in app/components/event.hbs, we use it as <Event>. We fill in the variables by specifying them just like HTML attributes, but with the @ prefix, which tells us that they're variables.
2. Lists
If you're paying close attention, you probably noticed that we weren't able to use our new Event component for the keynote talk. That's because the keynote has three speakers, and we only created space for a single speaker and image variable in the component.
We need to tweak the Event component so that it can handle an array (a list) of speakers and images.
<Event
  @title="Opening Keynote"
  @start="9:30am"
  @end="10:30am"
  @speakers={{array "Yehuda Katz" "Jen Weber" "Godfrey Chan"}}
  @images={{array "yehuda-katz" "jen-weber" "godfrey-chan"}}
/>
The {{array ...}} notation means that we're providing a list of items to the Event component instead of a single item.
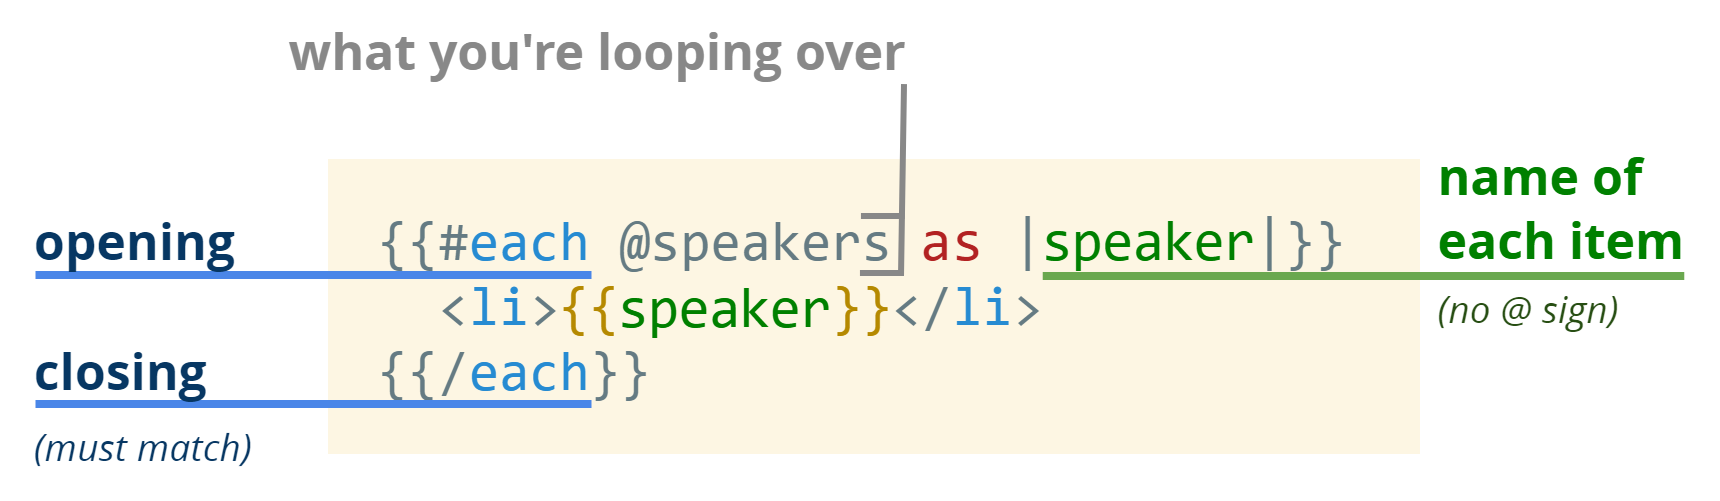
In order to use that list in the Event component, we'll need to learn one more piece of syntax. The #each syntax allows us to loop over arrays.
<li class="event">
  <div class="time">
    <p>{{@start}}</p>
    <p>{{@end}}</p>
  </div>
  <h1>{{@title}}</h1>
  <h2>
    <ul>
-     <li>{{@speaker}}</li>
+     {{#each @speakers as |speaker|}}
+       <li>{{speaker}}</li>
+     {{/each}}
    </ul>
  </h2>
  <ul class="images">
-   <li>
-     <img src="https://emberconf.com/assets/images/people/{{@image}}.jpg">
-   </li>
+   {{#each @images as |image|}}
+     <li>
+       <img src="https://emberconf.com/assets/images/people/{{image}}.jpg">
+     </li>
+   {{/each}}
  </ul>
</li>
Let's break it down.
Now that we've updated our component to allow us to provide speakers and images as arrays, let's update application.hbs so that all three of our talks use the component.
<ul class="events">
- <li class="event">
-   <div class="time">
-     <p>9:30am</p>
-     <p>10:30am</p>
-   </div>
-   <h1>Opening Keynote</h1>
-   <h2>
-     <ul>
-       <li>Yehuda Katz</li>
-       <li>Jen Weber</li>
-       <li>Godfrey Chan</li>
-     </ul>
-   </h2>
-   <ul class="images">
-     <li><img src="https://emberconf.com/assets/images/people/yehuda-katz.jpg"></li>
-     <li><img src="https://emberconf.com/assets/images/people/jen-weber.jpg"></li>
-     <li><img src="https://emberconf.com/assets/images/people/godfrey-chan.jpg"></li>
-   </ul>
- </li>
+ <Event
+   @title="Opening Keynote"
+   @start="9:30am"
+   @end="10:30am"
+   @speakers={{array "Yehuda Katz" "Jen Weber" "Godfrey Chan"}}
+   @images={{array "yehuda-katz" "jen-weber" "godfrey-chan"}}
+ />

  <Event
    @title="FastFlood: The Story of a Massive Memory Leak in FastBoot Land"
    @start="10:45am"
    @end="11:15am"
-   @speaker="Sergio Arbeo"
+   @speakers={{array "Sergio Arbeo"}}
-   @image="sergio-arbeo"
+   @images={{array "sergio-arbeo"}}

  />

  <Event
    @title="Octane: A Paradigm shift in EmberJS"
    @start="11:30am"
    @end="12:00pm"
-   @speaker="Suchita Doshi"
+   @speakers={{array "Suchita Doshi"}}
-   @image="suchita-doshi"
+   @images={{array "suchita-doshi"}}
  />

</ul>
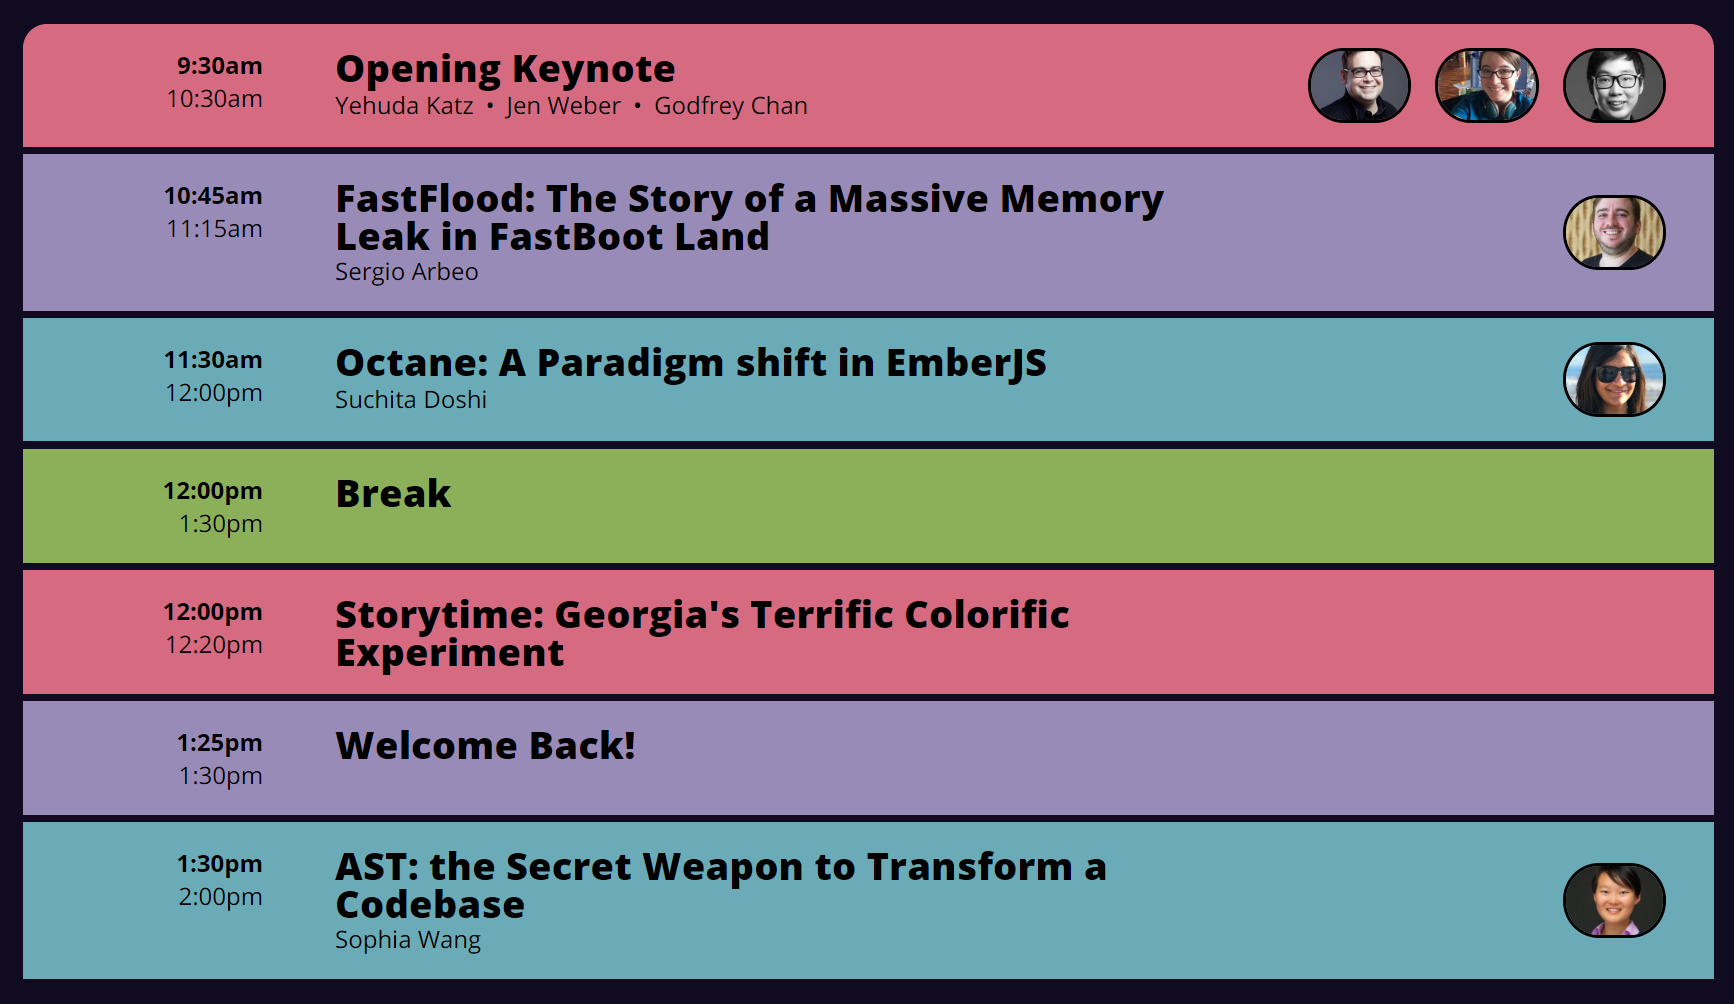
And now that we've created our component, let's fill in a bunch more sessions!
<ul class="events">

  <Event
    @title="Opening Keynote"
    @start="9:30am"
    @end="10:30am"
    @speakers={{array "Yehuda Katz" "Jen Weber" "Godfrey Chan"}}
    @images={{array "yehuda-katz" "jen-weber" "godfrey-chan"}}
  />

  <Event
    @title="FastFlood: The Story of a Massive Memory Leak in FastBoot Land"
    @start="10:45am"
    @end="11:15am"
    @speakers={{array "Sergio Arbeo"}}
    @images={{array "sergio-arbeo"}}
  />

  <Event
    @title="Octane: A Paradigm shift in EmberJS"
    @start="11:30am"
    @end="12:00pm"
    @speakers={{array "Suchita Doshi"}}
    @images={{array "suchita-doshi"}}
  />

+ <Event
+   @title="Break"
+   @start="12:00pm"
+   @end="1:30pm"
+ />
+
+ <Event
+   @title="Storytime: Georgia's Terrific Colorific Experiment"
+   @start="12:00pm"
+   @end="12:20pm"
+ />
+
+ <Event
+   @title="Welcome Back!"
+   @start="1:25pm"
+   @end="1:30pm"
+ />
+
+ <Event
+   @title="AST: the Secret Weapon to Transform a Codebase"
+   @start="1:30pm"
+   @end="2:00pm"
+   @speakers={{array "Sophia Wang"}}
+   @images={{array "sophia-wang"}}
+ />

</ul>
We can get away with leaving out the @speakers and @images, because #each doesn't do anything at all if it's iterating over nothing.
3. Cleaning Up the CSS
But after adding these events, we hit a little snag! Our CSS wasn't really designed for a situation with no speakers or images at all.
Let's make two small tweaks to our CSS.
.event {
  display: grid;
  grid-template:
-    ".    .        images" auto
-    "time title    images" auto
+    ".    .        images" 1rem
+    "time title    images" fit-content(100%)
    "time speakers images" auto
-    ".    .        images" auto /
+    ".    .        images" 1rem /
    10rem 3fr 300px;
  padding: 0 1rem 0 3rem;
}
The short story is that we force the top and bottom placeholder row to a size of 1rem. After doing that, the title sometimes grows a little bit too much, and isn't always consistent.
To tell the title row to grow no larger than the size of its content, we can use fit-content(100%), which basically means: the height of this row is the size of the content, and it should never grow beyond 100% of that size. In contrast, auto allows the row to grow under certain conditions.
The second tweak is to add an additional color.
- .event:nth-child(3n + 1) {
+ .event:nth-child(4n + 1) {
  background-color: var(--c-pink);
}

- .event:nth-child(3n + 2) {
+ .event:nth-child(4n + 2) {
  background-color: var(--c-purple);
}

- .event:nth-child(3n + 3) {
+ .event:nth-child(4n + 3) {
  background-color: var(--c-blue);
}

+ .event:nth-child(4n + 4) {
+   background-color: var(--c-green);
+ }
After making these two tweaks, the schedule is looking great again!
In the next post, we'll talk about how to pull the data out into a separate file, so you don't need to edit the HTML just to add new talks to your schedule.